|
The Dassault
Mirage F1 was used operationally by the South African Air Force (SAAF)
in the “bush” war in
Angola
in the 1980’s in both its CZ and AZ versions. Two
confirmed air-to-air kills were made by SAAF F1CZs
over Angolan Air Force MiG-21’s. Kills were via 30mm
cannon fire. The F1 was retired from SAAF service in
the late 1990’s and was replaced by the Cheetah C.
The CZ was the
South African equivalent of the F1C designed for the
Air Intercept (AI) mission. The SAAF requested Dassault
to design a ground attack specific variant of the F1 – this was designated the
AZ. The AZ differs from
the CZ as follows :
-
A
new nose section complete with laser range finder, ranging radar and
associated avionics – this replaced the air intercept radar nose of the CZ
version.
-
The
pitot probe relocated to below the nose tip
-
A
nose mounted retractable refuelling probe just forward and to the right of
the windshield – the CZs had no aerial
refuelling capability
-
A
moving map display in the cockpit – this replaced the CZ’s radar scope
Further to
these changes, the SAAF incorporated several local
modifications to both the AZ and CZ fleet to
increase their survivability and operational effectiveness. These included
:
-
The
original ventral fins were replaced with new composite units incorporating
integral chaff / flare dispensers (both AZ and
CZ versions). The modified fins were slab sided and are slightly different
in plan to the original Dassault design.
-
Passive
radar warning system including (both AZ and CZ
versions) :
-
two
rear facing antennae at the top of the vertical stabiliser on the trailing
edge, one each side
-
two
forward facing antennae located below the cockpit each side of the fuselage
-
An
antenna located on the nose undercarriage door
-
Some
F1 AZs were fitted with another pylon (between
the inboard wing pylon and fuselage) which was used to mount integral chaff
/ flare units. Similar units are used by the current French Air Force F1
CT/CR variants.
-
Just
prior to their retirement, the F1AZs were also
fitted with a low drag bomb rack with integral fuel tank fitted to the inner
wing pylons – each could carry 4 x Mk82. This
brought the maximum bomb load up to 14 (4 on centreline, 4 each on inboard
wing pylons, 1 each on outboard wing pylons – must’ve been fun taking
off in hot and high conditions !)
-
Some
SAAF F1s have also
flew with a jammer pod on the outboard wing
pylon
There are two
things that attract me to the AZ (apart from the
general aesthetic beauty of the aircraft) in favour of the CZ
:
I decided to
use the Italeri F1CT as
the basis for a conversion to F1AZ.
|
Click on
images below to see larger images
|
|

|
 |

|
Italeri
offers the only model of the single seat F1 in 48th scale. This is a
re-release of the Esci 48th scale kit.
The original Esci kit included the reshaped AZ
nose. Unfortunately, with the re-release by Italeri,
the AZ nose has been omitted as the kit aircraft
depicts the French Airforce F1 CT/CR model. Oddly
enough, a few parts on the Italeri sprues
do belong to the AZ - these are the pitot
probe, the extreme nose tip, the laser designator housing (inaccurate in shape /
dimension) and the refuelling probe.
I
decided to build the kit to represent an AZ with
typical combat load – this consisted of the centreline bomb MER
with 4 x Mk82 bombs, two 1,200 liter
wing tanks and two V3B Kukri wingtip mounted
missiles.
The Italeri
offering is overall an accurate representation of the Mirage F1 and has engraved
panel lines. There are however a number of fundamental problems with this kit
and a whole lot of areas requiring improvement / changes if an AZ
is to be built :
-
The
kit cockpit is too basic and must be replaced. I scratch built most of the
cockpit as I could not find a complete resin replacement set :
-
New
cockpit tub from plastic card
-
Neomega
resin MB Mk.4 ejection seat although this seat
is not entirely accurate for the SAAF F1s
-
Side
consoles from the Academy MiG-21 with bits added
from Eduard photo-etch panel set
-
Instrument
panel from Hasegawa A-4 Skyhawk as the size and
shape were roughly similar to the F1 – I made a mould of the A-4 panel and
cast a resin copy
-
Although
these side consoles and instrument panel are not correct in terms of layout,
the detail provided adds a sense of realism. The only really obvious part
missing from the instrument panel is the moving map display.
-
Scratch
built HUD and forward cockpit coaming
– again, some artistic licence allowed here
-
The
end result is a suitably “busy” cockpit allowing the main canopy to be
left open
-
Kit
main and nose undercarriage bays are very bare. The forward portion
of the main bays are incorrectly blanked off – I replaced all u/c
bays with units scratch built using plastic card, rod and stretched sprue.
-
Main
u/c legs moulding is poor – lots of work with sharp knife was required to
remove mould seams and filler to fill up ejector pin holes. Hydraulic lines
were added using stretched sprue.
-
Main
wheels have distinct perforated wheel hub (9 holes) – the kit parts
are incorrect. Due to the intricate nature of accurately trying to modify
all 4 of the kit wheels, it was easier to modify one, make a mould and cast
4 resin replacement units.
-
30mm
DEFA cannon – the recesses in the kit are too
shallow and the kit barrels provided are awful semi-round bits. I deepened
the recesses with a dremmel tool and replaced
the kit barrels with styrene rod suitably hollowed out at the front.
-
The
doppler antenna in front of nose wheel is not
flush with the fuselage as per kit – I used 0.5mm
plastic card to represent this.
-
The
kit ventral fin units are per the original Dassault
design and must be replaced to represent the SAAF
units with their integral chaff/flare dispensers. I had some resin Su-22
chaff/flare dispensers lying around. These were cropped to size (single row
as opposed to double) and sandwiched between layers of plastic card and cut
and sanded to shape. I made a mould of this new fin and cast a number of
resin units. As they are different in size (plan and width) to the Dassault
fins, the new fins do not slot neatly into the recesses provided on the kit
and an unsightly gap remains. The new fins were attached to the fuselage
with locating pins made from plastic rod and super-glued in place. Milliput
filler was used to fill in the gap between the fin and fuselage.
-
New
nose – I built up a solid block using styrene plastic. Luckily, there is
an F1AZ at the SAAF
museum at Air Force Base Swartkops in
Pretoria
from which I could take accurate measurements. Templates for plan and
sectional views were made from plastic card. The block was gradually shaped
using a dremmel tool, emory
board, sweat and lots of time, all the time comparing against templates.
Once the correct shape had been achieved, the various avionics panels and
refuelling probe cover were scribed onto the nose. The AZ
undernose laser housing provided with the kit is
too narrow and too short. This was beefed up using plastic card and Milliput
and sanded to shape and attached to the underside of the nose. A fairing for
the undernose pitot
tube was also added using styrene rod. The kit nose must be trimmed back to
accommodate the new nose and to ensure the correct overall length of the
aircraft. The solid nose was heavy enough to compensate for any tail-sitting
tendency that the model may have. Apparently the Heller 48th
scale Mirage V nose can be used – I could not find one and therefore
cannot confirm this.
-
Radar
warning receivers were added to the vertical stabiliser and forward fuselage
using plastic card and rod. The tailfin tip trailing edge antenna provided
in the kit must be removed as this is not correct for F1AZ,
while the forward facing antenna should be retained.
-
A
landing light was added forward of the nose undercarriage – this was added
by drilling a recess, painting silver and covering with gloss varnish. This
light is usually retracted once the aircraft is static on ground.
-
Horizontal
stabilisers – the rectangular stabiliser locating holes in the rear
fuselage were filled in with plastic card. Holes were drilled to allow the
stabilisers to be attached using plastic rod pins – this allowed me to
correctly position the stabilisers to simulate the correct angle of these
items on a static F1 – they usually have a slightly positive AOA
i.e. leading edge up when AZ is at rest.
-
The
afterburner cooling intakes moulded onto the rear fuselage are mis-shaped.
These were replaced by units made from plastic card suitably hollowed out at
their leading edge
-
The
centreline 4-bomb pylon had to be scratch built from plastic card. Mk 82 LDGP
bombs were obtained from the Academy F-111 kit.
-
V3B
missiles were scratch built to reflect the correct nose canard and tail fin
configuration – these are totally different to the Matra
missiles used by French F1s.
-
V3B
wingtip launch rail trailing edges faired in – the Italeri
kit part has what looks like a RWR antenna which
is incorrect for SAAF F1s.
-
Additional
drop tank cast from resin using the kit part as a master
-
A
Cutting Edge Su-22 afterburner nozzle was used. This is obviously not
entirely to scale (Su-22 has a monster engine compared to F1). However, this
is a great improvement on the kit part which is too shallow. The CE part
represents the corrugated AB tailpipe section nicely and looks good once
installed. Fuselage sides had to be thinned out with dremmel
tool to allow larger tail pipe to fit.
-
The
kit intakes end prematurely with a blank section. This was cut away and
plastic card ducts installed.
-
Airbrakes
were opened up and detailed airbrake housings added from plasticard.
The air brakes themselves were made from plasticard
using a punch and die set. F1s don’t usually
have airbrakes extended at rest but I thought these would add to the overall
predatory look of the aircraft.
-
The
narrow reinforcing strips between the upper and lower intake leading edges
and the fuselage were added.
-
Emergency
canopy release handles were added to the rear of the cockpit. Kristal
Kleer was used to simulate the transparency over
these handles.
-
Lots
of filler for fuselage and wing joints.
-
“Dark
Mirages” decals from Albatross decals.
|
Click on
images below to see larger images
|
|

|

|

|
Painting – I
prefer to use Xtra Colour gloss paints. They go on
well when airbrushed and don’t require gloss varnishing before decalling.
The final AZ low viz
scheme uses a colour called “Mirage blue” for the undersides which is unique
– see IPMS web site listed below for details of
colour schemes. I spent hours trying to match this blue to various colour
photos. The closest colour seems to be Model Master intermediate blue 35164 with
around 30% white to adjust and provide scale effect. Green and brown camo
was obtained by mixing various shades of Xtra Colour
greens and browns and adding ± 20% white for scale effect. The brown used in
the late low vis scheme is lighter than Dark Earth. I
use “Prestic” formed into worms to provide the
delineation between camo colours when airbrushing
– in 48th scale this works well and provides a suitably
“feathered” break between the colours. The cockpit is generally black dry
brushed light grey to pick our details. Undercarriage bays, doors, legs and
wheels and airbrake housings are all aluminium. Minimal weathering was done here
as these always seemed to have been maintained in a very clean condition. The V3B
missile is a light yellow colour best approximated using Humbrol
H71 pale yellow.
Once the paint
had dried, it was time for decals. Some words on the Albatross decals –
beautifully printed but with seriously limited decal location information for
the SAAF birds. There are a number of errors in the
colour drawings provided for the SAAF aircraft. The
low viz grey SAAF decals
are too light in colour when comparing with photos and do not show well against
the “Mirage blue” – they should be a darkish grey. Albatross advises that
standard NATO markings should be used but no location details are provided –
one can use the location details for the Spanish F1 provided with the decals but
I’m not sure how accurate these are for the SAAF AZ.
Even so, the numbering between the decal location drawings and the decal sheet
does not match entirely – I spent a whole evening scratching my head trying to
figure this all out. Unfortunately, the F1AZ at the SAAF
museum has been painted in a white/blue test scheme so I could not confirm the
accuracy of markings and decal location – a little licence had to be used. I
found that even on the gloss surface, using MicroSol
and Set, the decals tended to silver. I then applied the decals using Future as
a wetting and setting agent. This worked very well with no silvering. The only
concern I have with Future is that there may be a tendency to yellow over the
long term.
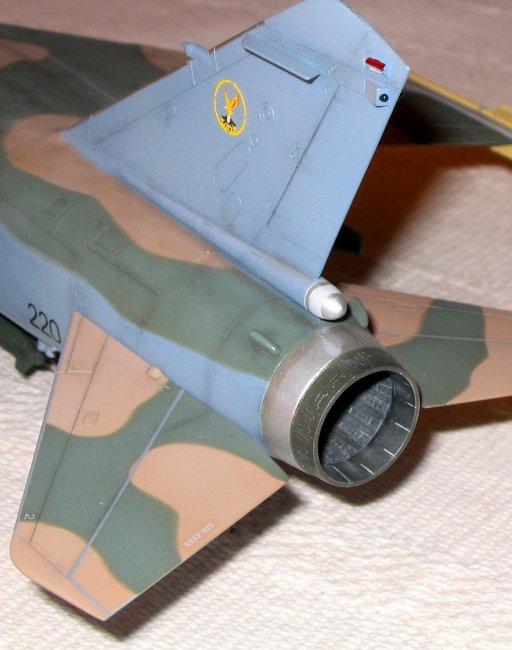
According to
the IPMS web site, aircraft #220 (the subject of my
model) was the only AZ used operationally (combat)
with the final low viz colours. However, at this
time the aircraft still had the relatively high visibility blue-grey SAAF
“Castle and Springbok” national insignia. My model represents this aircraft
later in life with the new “Caste and Eagle” insignia (c.1994).
The AZ
low viz scheme suffered from a relatively high level
of wear and tear. This was replicated using various shades of pastel. Dark
grey for panel lines on grey and brown areas, black on green areas. Panel
centres were lightened using light grey pastel. I find pastels allow a high
level of control during application and therefore prefer this technique to a
wash – one word of caution though – pastels tend to darken when covered with
the final matt varnish coat. Final coating was Xtracolour
Matt after which bombs, missiles and tanks were added.
Now all we need
is for Trumpeter to issue a 32nd scale F1AZ !!
References :
Malcolm
|
Click on
images below to see larger images
|
|

|

|

|
|
|