|
After recently getting back into
the hobby every kit has provided a valuable exercise in learning new tricks and
techniques. As a new modeler every kit should be treated as an opportunity to
try something new as well as refine techniques you have applied on previous
models.
This article outlines all the
challenges and more importantly the MISTAKES I made whilst building what was is
generally a straightforward model. It hopefully will help new modelers learn
from some of my common mistakes and also reinforce the fact that we all make
mistakes when we break into this hobby. In this spirit I will outline the
challenges and mistakes I made with this model. I would like to take the
opportunity to quote Mr. Thomas Kolb from his most excellent site An
Introduction to Plastic Modeling.
“Something that can easily stop
you from ever finishing a kit is the perfectionist that lives in most of us. I
know because I have been there more than once: I keep reading modeling magazines
featuring all those wonderful models with unsurpassed wealth of details and
beautiful craftsmanship. Even if I like to build models, I am not a professional
modeler and I know that I can never match those masterpieces seen in Scale
Aviation Magazine.
In the end, it's easy to refrain
from building a kit in fear of not being able to accomplish that perfect result.
Yes, I know it's silly, but I know that many model builders feel the same! It
takes quite an effort to overcome this nervousness and realize that a
half-decent finished model is a lot better than just another box in the
closet.”
If there is one thing I have
learned since starting back into this hobby it is that before starting a new
model project, try to make up your mind about what you want to achieve with it.
Be realistic - if this is the first time you touch an airbrush, or if this is
your very first model kit, you can’t expect it to be as good a quality as those
you see on the rest of ARC. Settle for a modest goal of perfecting learnt
techniques and experimenting with new ones and try to enjoy building your model
straight out of the box. There is nothing wrong with just having a good time
building a reasonably pretty model to be sitting on the shelf to be admired by
yourself and your friends.
It's generally a good idea to focus
only on a few details that makes the model appear great without actually being a
masterpiece. For aircraft, I believe that the most important part is the cockpit
area. This will definitely be the first thing that draws everybody's attention.
Alternatively....a colorful art scheme on the aircraft can detract from some of
the minor mistakes made.
OK…enough of the preaching and into
the article. First a little background on my modeling achievements to date to
help you gauge my level of experience before approaching this
project.
To date I have built:
- 1/72
Hasegawa UH-60
– First model with airbrush…looks OK but the paint job
was a little grainy…spraying too far away from model. Silvered decals
- 1/72
Hasegawa AH-64D Longbow – Used a spray can…nice finish..but not glossy
enough for decaling leading to silvered decals. This has
suffered some major damage at the hands of my girlfriend and will not be
rebuilt. But here are some pics including silvered decals and nice seam
running through the nose.
- 1/24 Tamiya Supra – Another Spraycan job..built for my
departing boss…turned out pretty nice…but not an aircraft and quite
large scale so was inherently easier.
|
Click on
images below to see larger images
|
 |
 |
- 1/48 Tamiya Corsair –
Also Spraycan job….but turned out very nice. First 1/48 model
for me and first model where I thought I was starting to bring everything
together. No weathering though and used decals for wingwalks when I
could have sprayed them myself with an airbrush. My lack of knowledge/research
meant I didn’t realize this. Research is important was the lesson
learned.
So...not an extensive list of credentials. And
certainly does not justify the large amount of models I have purchased. But with
every build I can feel myself getting better and I am very conscious of not
making the same mistakes again.
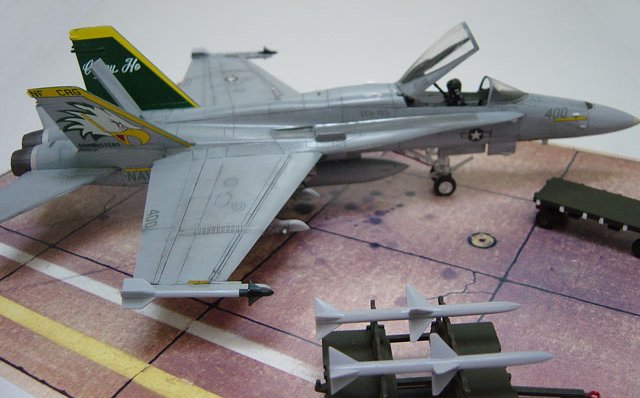
So lets look at the F/A-18C
I made. This was a very colorful scheme from the Dambusters stationed in Japan
and assigned to the Kitty Hawk. It had fairly complicated decals for the tail
and the Hasegawa kit does have its shortcomings. I'm not going to specifically
review the kit, just discuss the mistakes I made. For a good breakdown of the
issues with building a 1/72 Hasegawa F-18 I suggest Geoff McDonells' Gallery
entry on ARC that goes into fairly good detail. Many of these issues I faced
as well
First some pics:
|
Click on
images below to see larger images
|
 |
 |
To the casual eye this might look like a pretty
good build. But to the advanced modeler...well....I'm sure they could go to town
on the number of issues with this model. So lets break them down.
Star Decal
|
|
Placed
upside down! *slaps head* DOH! How the hell did I do
this? Read the decal placement instructions carefully...I didn't even realise I
had made a mistake till someone on ARC pointed it out when I showed some buildup
pics and had already clear coated over it. Could have corrected it but didn't
want to risk ruining the paint job and doing it again (time to do this hobby can
be tough to find). Decided to leave it as is a constant reminder and slap in the
face to stop me doing it again. |
Incidentally...I find that can be a good
motivator....that model that sits there on your shelf...staring you in the face
as you build...mocking you for making that stupid mistake.....yes
mocking....laughing at you......what's that you say....I suck at
modeling......why you little!......ahem....sorry...must remember to take my
pills.
Anyway...it's a great motivator for building your
current project with care and avoiding the same mistakes.
LEX Fences
|
|
Back the
front...this is tough as the instructions are not clear on which way they are to
be positioned and the angles on the piece are so subtle it can be difficult to
tell which way is correct. Check your references. I am now using
Squadron/Signal's excellent F-18 walkaround.
Although the walkaround
images on ARC are also a good resource in the absence of reference
books. |
Seam Line in Nose
|
|
The model
builds up with a upper fuselage piece being connected to a lower fuselage piece.
This line was never correctly sanded because I was afraid of losing the detail
around it (which was lost anyway). Lesson: Use masking tape to cover detail
areas and be very precise when gluing this area together. Use very thin glue
that wicks between the cracks when assembling this.
|
Seam lines in Rear
|
|
Again....be very precise when gluing. Don't just assume that a step in
the join can be sanded like I did....the constant sanding can ruin the overall
shape back here...I ended up breaking it apart and more carefully gluing the
rear together but it was too late...the damage was done. The lesson here is
don't rely on sanding like I have in the past...invest the time to try and get
the pieces aligned as accurately as possible. With a bit of luck you will then
only have to scrape the seam with back of a knife blade to clean it up and won't
need to sand at all. |
Antenna Placement
|
|
Again...instructions were very vague on where to place these...in
retrospect...just looking at the box cover would have provided me with correct
placement. Antenna should have been around the center of the
fuselage not tucked up under the LEX. Check your references! I can't
stress how important a lesson this was for me. |
Ladder
|
|
Been
corrected now but I had it on the wrong way. Again...check your
references. |
Landing Gear Placement
|
|
Now this is the most annoying thing. And to be
honest...I still don't know why it happened or why I continue to struggle with
landing gears. See the lean? I had tried to sand the tires flat a little to
simulate pressure on the tires...but in effect this all contributed to my model
being lopsided. Not sure what the answer is here.
|
Jason
|


