|
Here is the third
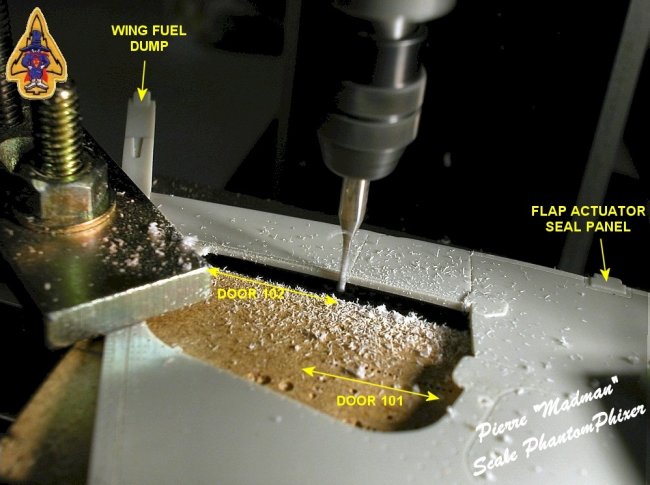
article about my F-4S Phantom conversion. Today's story focuses on two open
panels, located on the wing's upper surface: the doors 101 and 102 give access
to the fuel lines and aileron / speed brake actuators.
The fuel lines allow
transfer from the air pressurized wing and external tanks to the fuselage fuel
cell no 1. A separate valve, operated by a switch in the cockpit, allows to dump
the fuel out into the air, via the wing dump duct (a duct facing aft, located at
the outer wingfold).
All parts are
scratch-built, using custom-made photo-etched brass parts, and other
easy-to-find materials. The scale is 1/32, and the conversion is based on
Tamiya's F-4J.
| Opening the door
on the wing is the first (and easiest) step. I used a jigsaw to cut the
panel out, and did the finish with a milling machine. This helps me
getting very straight lines. |
Click on
image below to see larger image
|

|
|
|
Click
on image below to see larger image
|
|

|
|
Here you can see right
the wing - open - with the main landing gear well and all the hydraulics
I added. I had to remove a couple of strengthening beams to make room
for the inside of the doors. A grinding tool allows a very fast
and precise work.
|
Designing the parts to be etched
was next. A cheap 2-D CAD program is just fine. The parts are designed at four
times the actual size, and printed at a reduced 25% scale. A couple of paper
mock-ups helped chasing flaws and size adjustments.
|
Click on
images below to see larger images
|
 |

|
Etching is always fun. The first
image shows the door panels and various internal components, after a 10 seconds
dip into the etchant. Ok: it is not up to Eduard's standard, but fine enough for
me to be proud of :-) The second image is another piece, after the etch is
completed. The brass soaks in a batch to remove the chemicals. Later on I will
write a special article with more details on the photo-etch technique.
|
Click on
images below to see larger images
|
 |

|
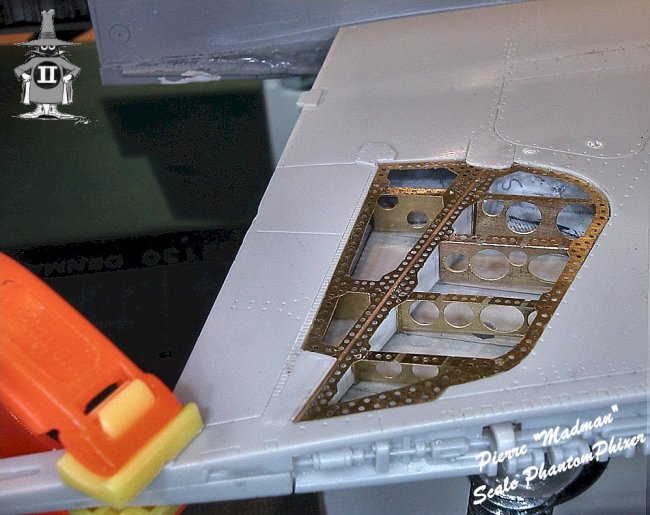
A couple of
fine-tuning actions later (cut-sand-test-cut-sand-test-start over...), et voilà:
the frame fits into the open door.
I love unpainted etched parts. It
always hurts when I pull the trigger of the airbrush.
Populating the
inside of the panels was a awkward job. I started with the fuel lines, made with
various sizes of soldering wire. Fuel valves, nuts & bolts and rods are made
with styrene, or bits of sprue. I airbrushed a base color (mix of flat olive,
yellow and green) to the area, Testors aluminum metallizer on the actuators, and
here and there a few red, blue and yellow spots on the fuel and hydraulic
lines.
The final result is
so close to reality that you can almost smell the JP-5 fuel. The area is quite
busy, and I can understand why working there was not the Phantom Phixers' cup of
tea.
Happy modeling!
Pierre
"Madman"
Scale PhantomPhixer
|