|
Here
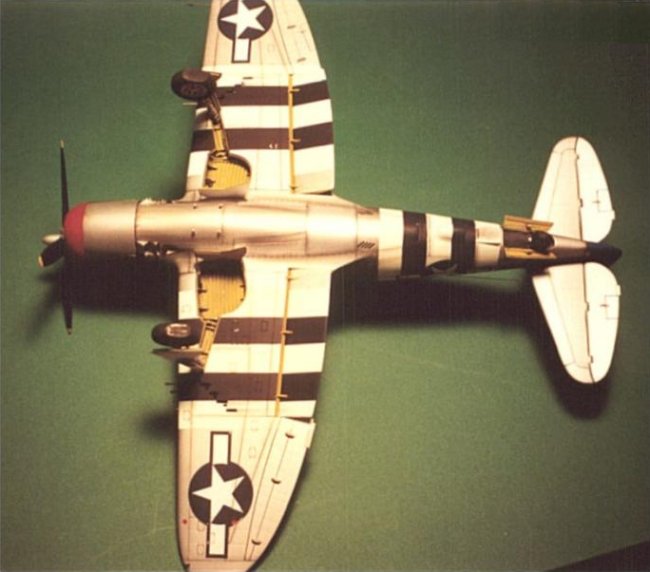
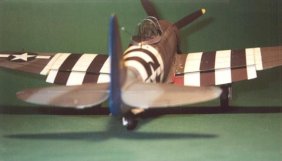
she is gang…… after a full years work…..Revel’s 1/32 P-47D in 56th
FG colors circa June 5th 1944.
This ship is “Oregon’s Britannia / Happy Warrior” flown by Group
Commander Col. Hub Zemke.
I
did a tremendous amount of research and actually talked to various members of
the 56th FG in order to get the color scheme as accurate as
possible…..and I am still not 100% sure it is correct (i.e. I have no
conclusive photo evidence). The 2 areas of contention are the wrap around
invasion stripes and the unpainted aluminum undersurfaces.
I chose both…based on my references.
| I
purchased this kit 10 years ago from AAA Hobby in Marietta Ga. (I think
it was actually out of production even back then). I always planned on
building into a museum piece. It was only last year that I got the inspiration to do so.
The kit itself is pretty ruff. Nothing is useable except for the major
components (wings, fuselage, stabilizers). But the basic outline of
these parts compares well with scale drawings……so you will end up
with a pretty good looking Jug. I even saved the cowl…and after some
rework got it looking pretty accurate. |
| Click
on image below to see larger image |
 |
|
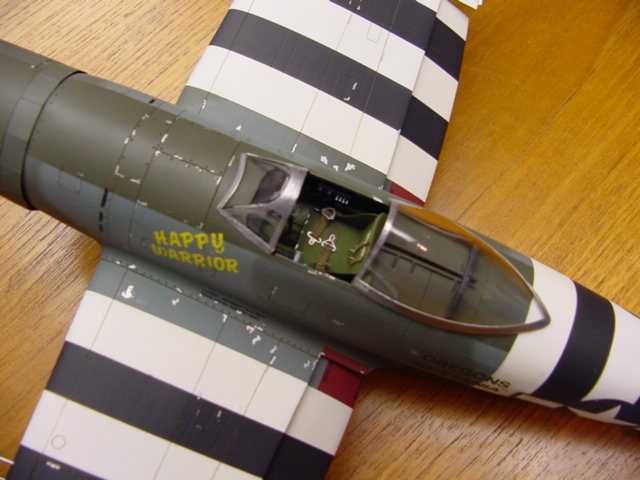
I
scratch just about EVERYTHING on this bird. I am a real die hard. I like to feel
it is a “one off” bird and when it goes to contests it will be all original.
You could save yourself loads of time by using Jerry Rutman’s excellent resin
parts. The scratch built items are as follows;
-
-Prop
-
-PW
2800 engine
-
-cowl
flaps
-
-complete
interior (inst. panel, gun sight, stick, seat, side walls etc…etc….)
-
-Landing
gear and gear bays
-
-Wheels
and tires…including tail wheel.
-
-All
gear bay doors
-
-Fowler
style flaps
-
-etc….
| Click
on image to see larger image |
The
key to scratchbuilding is to collect some good references and
TAKE YOUR TIME! I
cant tell you how many times I would scratch build a part and I would be
unhappy with the results so I would make another…… It is something I
learned from Rodney Williams. Remember, all of your parts wont be
perfect, and you will have to try, try again. |
|
Here
are some tips based on my P-47 experience……..
I
spent a lot of time scratch building the PW 2800. Although I know it is “all
in there” you cant see much of it from the front. Lesson….make a cowl panel
removable….or spend less time scratchbuilding the back of the engine.
Dropping
the flaps was a hell of a lot of work. Since they are Fowler style (they drop
down AND back) you have to scratch build the flap bay and reproduce the actuator
arms…..then get it all to line up correctly. But…it sure does look good and
I don’t think you will see many 1/32 scale Jugs with the flaps dropped.
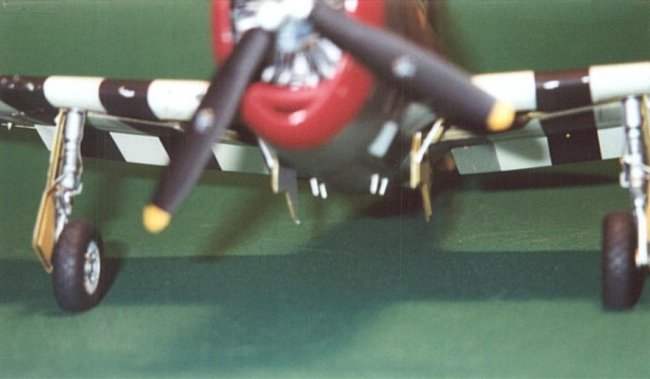
Make
sure the Machine gun barrels are PARALELL TO THE GROUND. They don’t follow the
dihedral of the wing (common mistake). When building the wings I “scabbed”
in a good size piece of solid Evergreen styrene stock in the gun barrel area.
This gave me an excellent mounting platform for my barrels. The barrels were
then “scribed in” when the model was in its assembly jig (more to follow).
The barrels themselves are S.S. tubing of appropriate size.
Believe
it or not…… I used the kit canopy. I fully expected to have to vacuum form a
new one but after close study I simply reworked the kit part.
All it takes is patience. File off the inside rail detail…then begin
sanding both inside and out. Start with 400 grit, 600, 1000, 1500, then polish.
THEN dip in Future. The canopy will
really “pop”. Ditto for the
front windscreen. I scratch built the canopy latch mechanism. The canopy framing
is buffed out lead tape with the rivet detail added with a needle.
Cowl
flaps are .005 Evergreen styrene sheet. Cowl was slightly reshaped with styrene
and putty then rescribed. I don’t know if it is perfect…..but it looks
pretty good to me.
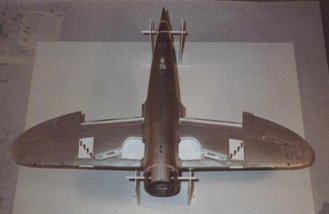
| Underside
of my Jug is aluminum finish. All of my references point to this. The
underside is painted with Model Master Aluminum plate with some lacquer
thinner added. I have found the lacquer thinner gives the paint more
“bite”. Then, some of the underside panels are covered with aluminum
foil. I always wanted to try this technique and am quite happy with the
outcome. The foil is a heavier gage than bare metal foil , and on 1/32
scale aircraft it just looks better in my opinion.
|
| Click
on image below to see larger image |
 |
|
ALL
of the rivet detail and panel lines were sanded off. Then the airplane was
rescribed using the needle and Dymo tape technique.
All
Dzus fasteners were added back with a pin vise. After close study of a real Jug
I decided not to add back the rivet detail. The rivets were quite flush and well
hidden. One thing I did notice however was the aircraft skin was “pulled
down” to the internal stringers forming a very slight linear depression in the
skin. (Look down the side of a riveted skin aircraft and you will see what I
mean). I reproduced this by LIGHTLY scrapping this skin depression along all the
rivet lines. BE CAREFUL. You want this to be very very subtle. If you over do it
the airplane will look horrible. I
errored on the side of too subtle and it came out just right. If you catch the
skin in the right light and angle you can see this detail. It does make the skin
look riveted on….way cool (it is
hard to see in the photos).
|
| A
big area that most of us modelers fall down on is alignment. We
glue together all
the major
components, fill all the seams, put on a perfect paint job….then dihedral
is inconsistent or that the stabs are crooked or that the gear is
misaligned…arrrrgh.
Not
me….not anymore. What I do now is for every model I build I build an
appropriate assembly jig. During major component construction the ship goes “in the
jigs” and all alignment and bonding gets done here.
|
| Click
on images below to see larger image |
 |
|
I
began by drilling very accurate 1/8 inch holes in the front and back half of the
fuselage. These holes then have 1/8 styrene rod placed thru them. This rod then
aligns the fuselage in the scratch built jig. These “construction holes”
will get filled in later. The key is to use your common sense and ingenuity
here. The jig does not have to be expensive…but it does have to be accurate. I
learned this technique from the writings of Rodney Williams, George Lee and John
Alcorn. Once this jig is built you
will be amazed at how much you will use it. On this project I used it for the
following:
-
-Wing
Alignment
-
-Horizontal
stab alignment
-
-Dropped
flap alignment
-
-Dropped
tail surface alignment
-
-Machine
gun barrel alignment
-
-Landing
gear alignment
-
-Landing
gear door alignment
-
-Engine
alignment
-
-Prop
alignment
Let
me tell you folks…… I never would have got this airplane “squared up and
right” without the jig.
|
Click on images below to
see larger images |
 |
 |
The
aircraft wings were tied together at various locations along its chord with .025
styrene rod. Simply drill a hole thru both sides of the wing…and insert the
rod for strength. I use super thin super glue to secure the rods because it
sands out so well. This technique will make your wings super stiff and strong.
No more worries about popped wing seams. (ANOTHER Rodney Williams lesson…thx
Rodney).
Here
is my painting/finishing technique……
After
the model is sanded, scribed, sanded, washed and ready for paint………..
-
-Give
the bird a few light coats of Future. I have found this blends the panel lines
and fills any tiny surface blemishes.
-
-Paint
with Model Master Enamels. I love these paints. Don’t care for Acrylics.
-
-Overcoat
with Model Master Clear Top Coat Gloss Enamel. I love this stuff. Let dry 3
days.
-
-Add
Decals. My Nat insignias were from the spares box. All other decals were hand
made or painted. I love to use Letraset dry transfers on clear decal film.
-
-Overcoat
with Model Master Clear Gloss. Let dry 3 days.
-
-Accent
and weather all panel lines with Winsor Newton WATER COLORS. I love this
technique. Your base coat is never in danger of being ruined.
-
-Overcoat
with a 50/50 mix of Testor Dullcote and Testor Metalizer sealer. I love this
blend. Let dry 24 hours.
-
-Final
weather with pastels
-
-Final
overcoat with Dullcote / Sealer blend.
|
Click on images below to
see larger images |
 |
 |
This
baby was a lot of work……but well worth it and a lot of fun.
I
don’t have above average modeling skills. Anyone can do this. It just takes
INSPIRATION AND PERSPERATION. Remember…..if you count on having to do various
steps “2 or 3 times until you get it right” …it wont be nearly as
frustrating.
Now
where is that Razor back version hiding in my closet!
John
|