|
A little history
The Christen Eagle was introduced in 1978 by Frank Christen and set a new
standard for kit aircraft due to its very high quality and completeness.
When I first saw it in 1980 I decided to scratch build one of my own in about
1/24 scale. I ordered the info pack that was offered at the time from Christen
Industries and a poster set. From this information I was able to build a brass
tube fuselage frame. This was about all the further I ever got on that project
since I decided there were other models I wanted to build in my life time.
Ever since, I have collected pictures from magazines, and even taken a few of my
own when I saw them at airshows. The Eagles Aerobatic Team was one of the best
in the World. Having seen the team perform many times in their single
place Eagle I aircraft, the action started right after take off with all three
aircraft doing a inside snap roll and the action didn't stop until they landed.
About nineteen years or so after that first project, I was at the Williams
Brothers website reading their message board when I came across a posting that
said anyone interested in aerobatic aircraft. It was from Pete Groves the owner
of Airshow Models.com explaining that he was going to be making resin 1/32 scale
aerobatic aircraft. In 2 seconds I was at the airshow models site looking at
molds of what would soon become the Christen Eagle II kit. I could not believe
it! I contacted Pete about the kit and when it would be out. I got the kit in
June of this year and finished it on October 19th.
The kit
When I ordered the kit I thought "well its in resin and I will do what ever
I can to make it look like a Christen Eagle". Having seen other resin kits
that look like some kind of molding accident I didn't know what to expect, but
the pictures he had sent to me of it setting together looked great. When I
opened the kit box I was quite pleased to say the least. This in my opinion is
what a resin kit is suppose to look like. Clean crisp detail, almost no flash, 2
canopies, (in case you screw one up), white metal parts, a photo etched sheet,
complete instructions with history and decals for 2 different paint schemes.
Wow!
I started by assembling the fuselage and bottom wing together. Next came the
elevator. I cut the elevator at the hinge line to be reset later in the down
position. You will have to add some plastic scrap to the opening just after the
elevator on the fuselage. After the wing and elevator joint were filled and
sanded, I started on the cockpit. I decided that with such a large and clear
canopy, that I could assemble it in the closed position.
|
Click on image to
right to see larger image |
I
added a few details of my own to the many that are in the kit. The first
was a canopy frame made from brass rod. This was made to fit the white
metal cross member and simulated canopy hinge that come with the kit (see
photo 2 new plastic). Next I added a small lip of plastic around the
canopy opening to give the brass frame a place to sit. This also gave me
something to glue the canopy to. Next I cut and fitted the canopy to the
opening. |
|
|
Click on images to
right to see larger image |
On
the real aircraft the canopy is made up of a one piece plexiglass unit,
set into a metal frame work, with a fiberglass skirt. The whole unit opens
to the left side. I decided to simulate the skirt around the canopy with a
thin plastic sheet glued around the outside (see photo 3 canopy cover
).
While
this was taped in position I decided to dry fit the rest of the kit. (see
photo 4 dry fit). After fitting all the pieces, they were removed and I
began painting the cockpit.
|
|
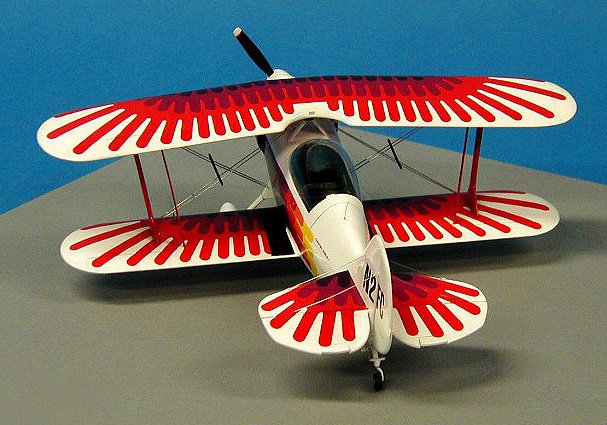
I decided that I was going to model
this Eagle after the first Christen Eagle built N2FC. Since this is the aircraft
that appears in the info kit I bought in 1981 it is the one I have the most
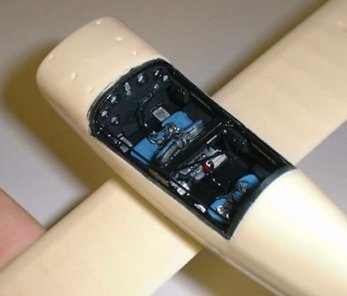
documentation on. The cockpit of N2FC is mostly flat black with only the seat
cushions in a medium blue color. The cockpits of Eagle IIs vary from builder to
builder since it is a kit built aircraft.
The kit includes the front and rear seat assembly, with seat belts molded in,
canopy latch panels, throttle quadrants, and control sticks, I added a manual
fuel pump to the bottom left of the back seat and various small info
decals. The kit comes with a great dashboard and decal for instruments.
There are also decals for the EXPERIMENTAL text that is on the right side of the
cockpit. (See photos 5 and 6). After a little dry brushing to bring out a few of
the details I was ready to glue on the canopy and the new skirt I had made.
|
Click on images below to
see larger images |
 |
 |
Next I deepened the exhaust opening
on the cowling and attached it to the fuselage. This required a bit of sanding
since the cowl is a bit wider than the fuselage. The landing gear legs were
next. After very little filling and sanding I was ready to move on to the cabane
struts.
When the kits were first done Pete e-mailed me and told me the kits were ready
to be shipped but he was just was not happy with the cabane struts and how they
were molded in white metal. I told him to send me the kit and I would make my
own. Which is what I did. This was kind of a blessing since I was modeling the
first Eagle built (N2FC) and it did not have a fairing at the top of the cabane
struts like the white metal part in the kit. I made my own cabane struts and
attachment points. It was at this time I final fit the
top wing and outer I struts. Next I fit and glued the wheel paints to the
landing gear.
|
Just
a small note: Pete has sent, everyone who has bought a kit, brand new
brass parts to replace the white metal ones These new parts are much
stronger and molded cleaner. This should give you some idea how committed,
Pete Groves at Airshow Models.com, is to making a quality kit and making
sure, you as the buyer, are happy with it. Thanks Pete! |
|
After I assembled the prop blades to
the spinner I added a cuff that is around the opening of the spinner. This has
now been added to the new spinner you get with the new metal parts. Next was
final sanding and primer. When I was satisfied with the finish of the primer I
rescribed the panels lines (not too many of them) and got it ready for gloss
white.
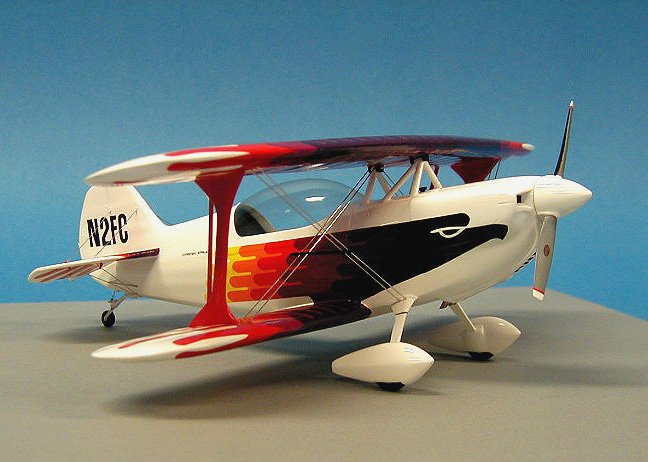
After painting it all gloss white
and letting dry for a few days, I was ready for the part I had been waiting for,
decals. The decals are fantastic in this kit which is important since they cover
at least 90% of the aircraft. They lay down great and only need a bit of
Solvaset on the leading edges to get them to conform. I started with the bottom
of the lower wing and elevator. Next was the top of the bottom wing and
elevator and fuselage sides. I finished with applying the top wing decals after
painting the I struts that I glued in. I made the registration numbers on the
computer and printed them on decal paper along with new prop decals. The prop
decals in the kit had a yellow background instead of gold.
When the decals were completely dry, I touched up a few places with paint and
gave it a coat of Testors gloss lacquer. I am not sure I would do this again
since the decals started to crinkle in some places. This fortunately went away
after the paint dried. Next time I will use future floor wax. After the clear
dried for about three days I used Novis plastic polish to buff out everything.
While polishing the top wing I decided to drive my finger nail right into the
top wing decal all the way down to primer. Many words were said that I can
repeat that night. I e-mailed Pete and he was able to send me new decals and a
new top wing in case I needed it. What a life saver! Thanks Pete. While waiting
for the new decals I finished the prop and started detailing the rest of the
aircraft.
I had most of the white metal parts on the plane when I got the new brass parts
from Pete, which were shipped with the replacement decals. So I was only able to
make use of the new brass tail wheel assembly. After painting it white and
detailing, it was glued on. A tailwheel control arm for the rudder was made from
plastic and connecting springs from a single strand of copper wire. These
details can be seen in the photo taken from behind.
(see photo 8).
After the top wing was redone, all flying wires and details were added. The kit
gives you photoetch flying wires and javelin struts, which I though were just a
little too wide in width so I used guitar strings in two different sizes for the
flying wires and made my own javelin struts from plastic rod. I did use
all the other photoetch parts, which include, aileron drive arms, rudder drive
cables and canopy handle. The last thing to add was the prop.
| Click
on images below to see larger images |
 |
 |
 |
In conclusion this was one of the
most satisfying kits I have ever built. Will I build another one? You bet.
Airshow models offers a conversion to make the single place Team Eagle and will
soon be coming out with a S-2B Pitts Special.
I would like to thank Pete Groves at Airshow
Models.com for the parts and encouragement and thanks to Bill Cook for
taking the pictures.
Clint
|
|