|
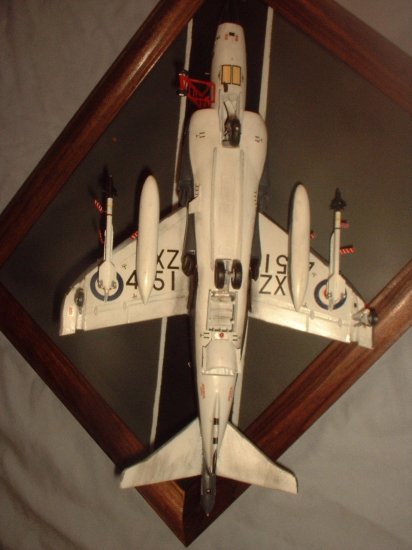
The Sea Harrier or "Shar," is a Navalised version
of the original Harrier which entered service in the mid 70's and is still in
service today with the Royal Navy and Indian Navy. This kit is an old one (in
the instructions history, it does not even mention the Falklands War) and is
lacking detail, has raised panel lines, as well as many inaccuracies, but was
still fun to build and turned out well. If you are looking for a easy Sea
Harrier you might want to look at the Airfix kit instead, not to mention this
kit is not on the store shelves anymore. That said lets get down to the
build.
(click on
any of the images below to load the full size photo)
| Rescribing
Before I got the glue and paint out, I began by
rescribing
the kit as much as I could using the raised panel lines as a guide, and although
I had a few uneven lines and skips it still made the finished product look a lot
better. I found that a sharp X-Acto #11 blade worked best although I also used a
needle in some spots. To create the look of rivets in certain spots, I drilled
small holes to simulate the rivets. Not only did I rescribe most panel lines, I
had to had a few new ones and correct some other ones. The area reworked most
was the top of the aircraft especially in the rear of the main wing, moving
certain lines, adding a fuel access hatch, adding a small hole/grove in the
center, and moving the navigation light to the side (more on that later). I also
drilled out the camera window and later after painting added a thin window made
from the clear
plastic film that came from the package that # 11 blades come in. At a recent
kit swap I got to see why Tamiya had things in the wrong place, I examined
Tamiya's other Harrier kit from that time period (AV-8A and GR mk 1) and found
it is almost the same kit (fuselage halves are the main difference). They must
have done research on one aircraft and assumed that details were the same on
all, (like the nav beacon) so check your references with these kits!
|
|
Cockpit
| The first thing built was of course the
NeOmega cockpit set (see my
review on that ) and was the easiest part of
the project. The scratchbuilt HUD was done using shaved strips of plastic stock
and again clear film from a package of # 11 blades. The other work done in the
cockpit area is combining kit rear canopy and the NeOmega rails and bulkhead
detail as well adding the small vent on the outside (plastic tube cut at an
angle then drilled out).
|
|
| Once that was done I did a lot of work on the fuselage halves, building
the blow-in doors around the intakes (in every reference photo I have seen of a
parked Harrier, they are half open because of gravity) and creating the landing
gear bays (the back one was kind of there, the front one did not exist, it was
just an open hole). The blow-in doors were cut out of the intake parts before
being glued on, and built with a lot of evergreen plastic stock, supper glue,
and sanding like crazy. Although I used a ruler and tried to match the kit panel
lines, they are somewhat uneven and sloppy, but in the end better than nothing
and add interest to the plane. |
|
Landing Gear Bays
| On to the landing gear bays, not only did I add ribbing, I also had to
cut a new section out of the rear one that the main strut sits in. I used photos
from ARC's walk around section of a AV-8B wheel well, because although changed
in many ways the AV-8B kept the original landing gear arrangement and I have to
assume the details are similar (if you have any Sea Harrier wheel well pictures
please send to ARC's walk around since I could not find any elsewhere on the
web). I also cut the landing gears mounting pieces off and drilled holes in both
to accommodate straightened paper clips for strength and added tubing to the
rear one so that it would be the right height inside the new bay (or so I
thought). After I felt all was done I joined the two halves, fit was better than
I thought with only minimum filling needed. next came the wings, these were also
a good fit except underneath where they join the fuselage although I would
rather that since it is very hard to see and I got rid of most of it. |
|
| The wing
fences on the leading edge did not match up though and had to be cut and built
back up with plastic card. |
|
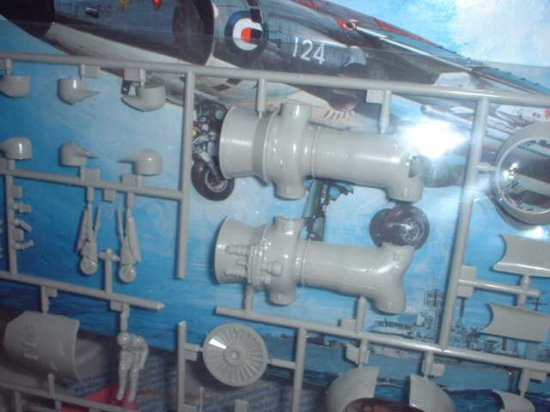
| One nice touch of the kit is that Tamiya
includes a Peagus engine that according to the instructions is meant to be
displayed inside the aircraft with a hatch that can be removed and placed back
after viewing. I instead have chosen to display the engine separately on a stand
(will finish it sometime in the future) and use scratchbuilt intake covers on
the aircraft. |
|
Because of this I glued the hatch in place and found it is a very poor fit and
needs a lot of filling and sanding as well as rescribing after the fit is
right. Before gluing the
horizontal stabliser on, I built the four notched fairings that sit above and
below the joint with the fuselage using more plastic card, this detail is also
missing from the kit. |
|
|
Another added detail on the wings was the two wingtip nav
lights which I used melted clear sprue and pushed it into the hole I cut for it.
|
|
The next time consuming part of the kit was the completely wrong
windscreen canopy fairing, again left over I think from the AV-8A kit (although
wrong for AV-8A too). On the real Sea Harrier there is a large hump that covers
the windshield wiper motor and a smaller notch to the side and the hump comes up
and over part of the windscreen. Tamiya of course depicted none of this and made
the joint a straight flat area. I glued the front canopy in place with super
glue (applied carefully!), built up the area and added the part of the hump that
covers canopy with plastic card, milliput and supper glue. Although it looks
much better and closer to the real thing I wish it had more of a
notch in the center but it was a very hard shape to build. Just below this is
the air data sensor and in effort to make it look like the real thing, I decided
to replace it with a sewing needle (measured to scale, cut the top off and
drilled a hole for it) to create a more realistic look. |
|
Painting and decaling
| My least favorite part of any project came next, the painting
and decaling. Since I am still learning things (just returned to hobby six
months ago) painting is my weakest skill and I needed to strip and re-paint this
model several times to get it right. This was my first high gloss aircraft and I
used a gloss white on the underside (Testor's insignia white) and it worked well
but also was a pain in the but. I found it covers well (can't see through it
like flat white) but it is very thick and tends to build up in big white blobs
in the corners if you don't watch it, again I think my fault more than the
paint. The top went a lot better, I used Testors Gunship Grey darkened with a
small amount of black (see this site for colors; http://www.faasig.org/colors/mmpaint.htm)
and then glossed it after with future and Testor's gloss acrylic. |
|
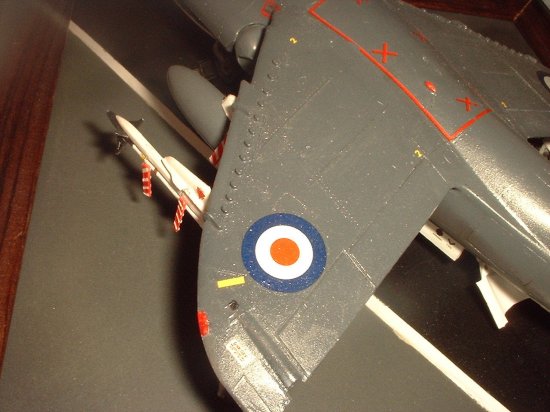
| Because the
kit was an old one I worried about the kit decals and decided to cover them with
Microscale's decal film, and thank god I did. Somehow I missed one little spot
on one of the roundels red dots (separate decal) and it crumbled into a million
little pieces (painted red in it's place) showing what would have
happened without the decal film. The other decals went on just fine without any
problems-thank you Microscale!
|
|
Weapons
Next is the weapons fit, I at first wanted to use the Aden
gun pods but they are weak at best and would be quite a project in of
themselves, so I opted to take the easy way out and used the ventral strakes
that go in it's place. The fuel tanks are almost a standard fit since the Sea
Harrier has poor range, these were from the kit and needed a lot of sanding to
get the mismatched halves to look even. The kit Sidewinders were
replaced with Hasegawa weapon set AIM-9L (standard winder used on Sea Harriers)
since the kit winders were only shapes with no detail.
Navigation Beacon
|
Other than putting on some antennas the other external addition was
the nav beacon on the top of the wing. I made this teardrop shaped light with
super glue gel that I shaped before it dried. I had been trying to use clear
sprue melted but couldn't shape it right. Be aware that the glue shrinks a
little when it dries so more than one layer may be needed. I also painted the
surface below red first, but since the glue dries clear it may be fine to paint
clear red or green after the fact. |
|
Landing Gear
One of the last things worked on was the landing gear, adding
wiring, plumbing, lights, and other details to the bays and the gear themselves.
After I glued them in, I found that the rear main gear was some how not touching
the ground when I added the outrigger gear because I had measured wrong, in the
words of Homer Simpson ...Dhoooo! Oh well, I cut the outriggers down slightly
and added some paper clip and staple metal to the drilled out inside of the gear
to help with strength after I broke them off a few times. In the end they are
now level on flat surface and life goes on.
The final touches were added next, Remove Before Flight tags, intake covers and the boarding
ladder.
| The intake covers were made from plastic card that was cut to shape
before I ever glued on the intake parts and the straps were made with masking
tape painted black. |
|
| The boarding ladder was scratchbuilt using plastic strips
and rod, matching it to pictures in World Airpower Journal. It was a pain to
glue because getting all the rod to hold together was tough, but finally got it
to hold. |
|
| I also added photo-etched Royal Navy chock blocks from the Airwaves
Buccaneer set. And that was it! |
|
I started this kit thinking it would be an easy and quick
build and somehow it turned into a monster, but a good monster. For me this was
another learning experience, letting me try techniques I had never tried before
and perfecting other methods
that I had tried before. For fans of the "Shar" this may not be the
best kit out there but with a lot of work looks good in the end.
Everett
References;
-
World Air Power
Journal volume 4 winter 1990/91,
-
World
Air Power Journal volume 6 summer 6
1991,
-
World
Air Power Journal volume 32 spring
1998,
-
World
Air Power Journal volume 41 summer 2000
|
|