|
As a Phantom Phanatic and avid modeler of the F-4, I patiently waited for the
release of an accurate and improved version of this aircraft in 1/32 scale. Four
outstanding kits have finally been released over the last few years - an RF-4C and F-4E by
Revell, an F-4C/D and F-4J by Tamiya. Since this is the only way anyone will be able to
see a Phantom of any size in three dimensions pretty soon, I eventually picked up all of
them. All the kits are really nice. Although the Tamiya kits are superior, they also cost
twice as much. The Revell RF-4C, I believe, is currently out of production but you can
find them at shows. The Revell F-4E was released this year and can be had for $35-$40. The
Tamiya kits are still available and can be had for $70-$80. Since the RF kit was the first
to come along and the first I picked up, I chose to build it first and use it as a subject
for this article. Actually, I'm partial to long nosed Phantoms. I built it primarily out
of the box using Cutting Edge decal set CED32003, $12.95, available from Meteor
Productions. This decal set is not only super, it will come in handy when you make the
correction on the fin tip and do your exterior painting.
The Revell kit is molded nicely, has recessed panel lines and comes with
markings for RF-4C SerNo 65-0833 of the 106th RS, Alabama ANG, Birmingham. The early style
and later F-15 centerline tanks, wing tanks and an ALQ-119 ECM pod are included in the
kit. They also include both Air Force and Navy style inner pylons along with Sidewinder
launch rails. Cameras are included for the camera bay area. This is a nice kit for the
money. However, there are a couple of minor problems, and some structural modifications
that should be done and a few things to add. I won't go into the basic kit assembly and
painting - the kit’s instructions should be followed for the most part. I will tell
you what I did to make a beautiful replica of a great plane.
The seams where the intakes meet the fuselage do not fit together well and
require some gap filling, grinding and sanding after assembly. I use Locktite 494
SuperBonder for gap filling, fixing imperfections and as an adhesive, as it doesn't shrink
like putty. The fin cap is the wrong shape and is too tall, but is easily fixed. Follow
the instructions that are included with the Cutting Edge decals to reshape the fin.
The engine intakes lack the formed inner tunnels, but they do have the engine
compressor blades. I believe there are some after market resin pieces available now. There
were none when I built it so I built it the way it came.
To make the camera bay look more authentic, I took drinking straws, cut thin
strips, added them to the camera lenses, painted them with black chrome and filled them
with Super Scale Kristal Klear to make them look like real lenses and add some depth.
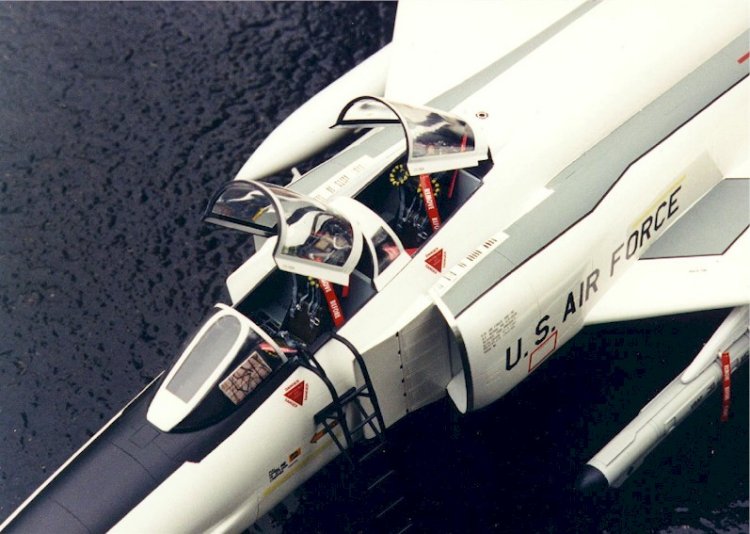
The cockpit side panels and instrument panels are accurately represented with
raised details and instrument bezels. They also include blank instrument panels for those
of you who are masochistic and want to torture yourself with all that photo-etched stuff.
I used the detailed panels, you can't do any better than them.
The seats are a different story. They are molded with belts that don't resemble
anything that I'd ever seen in a Phantom and I've seen lots of them and the ejection
curtain handles are wrong. Throw the seats out. I replaced them with resin seats by
Paragon, also available from Meteor Productions. The price is a little steep at $21.95 a
pair - almost what the whole kit cost - but they are worth it. Each seat is full of
details, with seat belts molded in different positions on each seat. A number of other
aftermarket seats are available, and any of the others will suffice. Just don't use the
kit seats unless you are determined to do it out of the box.
The kit comes with regular tires and a set of bulged tires to give the
appearance of weight sitting on them. I used the bulged tires. I'm not too sure about this
'bulged' tire thing. The more I look at aircraft sitting, there isn't much of a bulge to
the tires.
The main gear and wells are molded nicely, but there is a potential problem
where they mount in the well, part #58, the lower half of the wing. As this is a large,
heavy model, the landing gear should be strong where they fasten
into the wells, and this appears to be a weak spot. There is not much strength
there if you just glue the main gear into the lower wing wells, even if you use a
"Super Glue." Here is how I made this joint super strong.
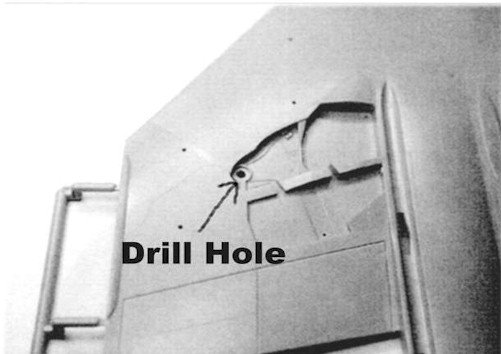
Before you assemble the wing halves, drill a 1/8-in. diameter hole in the lower
half where the main gear fit. See figure 1. Assemble the wing halves. Assemble the main
gear. Drill a 1/8-in. diameter hole down through the center of the top of each assembly.
See figure 2.
When you are ready to install the main gear, make two dowels. Cut a couple of
short pieces, approximately 1/2-in. long, 1/8-in. diameter aluminum or brass tubing or
rod. I used aluminum tubing because that's what I happen to have. Stay with metal.
Obviously it's stronger.
Test fit before gluing! I used SuperBonder 494 to glue the dowels into the
well, then the main gear onto the dowels. 494 doesn't set as fast as the other super glues
so you have a 'little' time to make any adjustments. However, once it sets, it sets! Make
certain you have them straight and push them completely down into the socket. Now you have
a super strong main gear assembly for your Phantom. The nose gear seems adequate the way
it is. Assemble according to instructions.
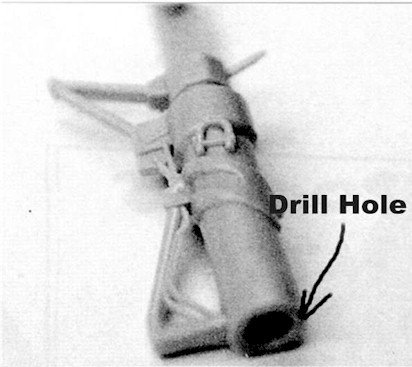
Another weak point that needs strengthening is the pitot tube - not only on the
RF but every airplane kit that has a nose pitot tube. I used to break them off all the
time while handling the model when painting and/or assembling. Not anymore. Get yourself a
large paper clip and a drill bit the same diameter as the paper clip. Where the pitot tube
fastens to the nose cone, drill a hole down through the nose cone. See figure 3. I use a
pin vise to do the drilling. It's not necessary to use your power drill or drill press,
as. you have better control with the pin vise. Besides, you're only drilling plastic! Cut
a length of paper clip longer than required. File and sand one end to a point, apply some
SuperBonder to the other end and push it into the nose cone, leaving the appropriate
length sticking out.
Fill around the joint and, when dry, file and sand to the contour of the nose
cone. As a matter of habit, I do this to all the aircraft I build. No more broken pitot
tubes. Use different size paper clips and equivalent drill bits for different scales.
Complete the remainder of the kit sub-assemblies as per kit instructions.
As I mentioned earlier, I obtained Cutting Edge decal set CED32003. As the fin
tip on the Revell kit is wrong, this set includes instructions for correcting it. It is
fairly simple. Just follow the instructions.
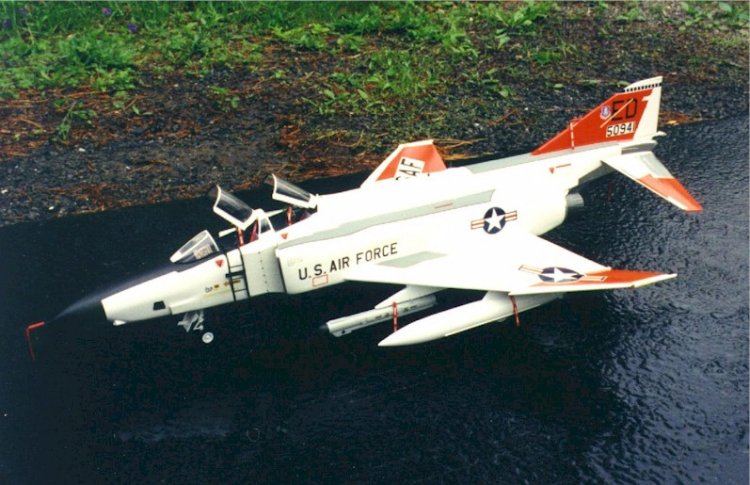
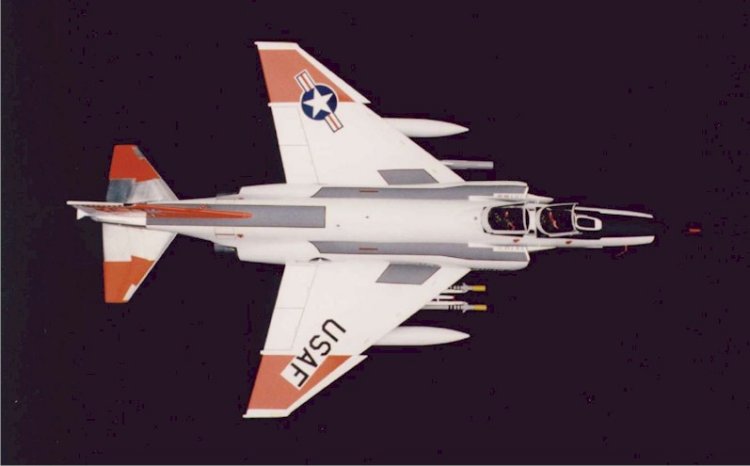
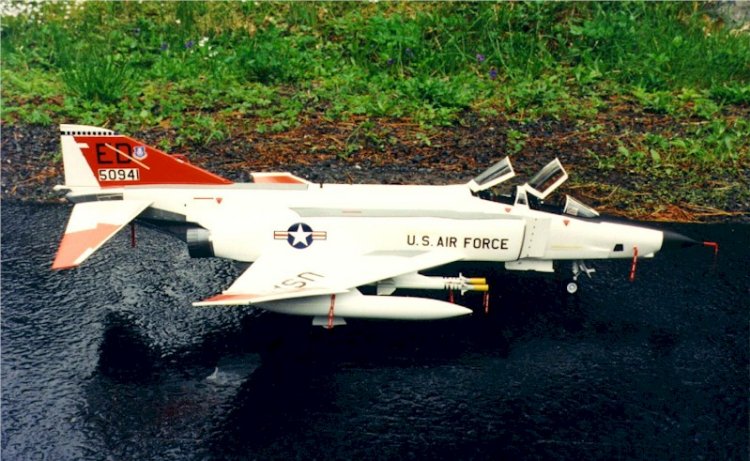
This decal set includes markings for RF-4C #50941 of the AFFTC at Edwards AFB.
I decided to use these markings, being partial to bright, colorful aircraft. All paints
used are Model Master enamels. I first sprayed all the walkway areas with FS36231, then
masked them according to the templates supplied with the decals. You have to modify the
engine/fuselage walkway template, as it's not right for the Revell kit. I know, the
instructions say "the walkways were actually a non-skid material applied over the
base color, which essentially just darkened the base color somewhat." However,
looking through my research material it is apparent that some Phantoms had FS colors
painted on the walkways, and we all know how many different variations of one particular
scheme have been applied to the same type aircraft. Especially Phantoms. I also wanted
them to stand out and help break up the white. See figure 4.
I then painted the anti-glare panel and nose cone flat black and masked when
dry. I use black chrome, a car color in the Model Master line. It's more durable than
their FS37038 flat black if you have to adjust your masking. It also masks easier and has
a nice satiny look. I masked off all the areas that are to remain bare metal and sprayed
the model along with the wing and belly tanks FS17875 white. Do the elevators too. Mask
the bare metal areas and paint FS17875. If you don't, the FS12197, which is what they are
painted, won't match the wing tips. I hope I haven't lost anyone? In other words, make
sure there is white under all FS12197. Follow the instructions supplied with the decals to
mask the white for application of the orange. I used Scotch brand (green) magic tape to do
the masking and frisket film for the Stars and Bars, serial number block and USAF
template. See figure 4 & 5. Scotch tape makes a sharp, crisp line and it is thin, so
it doesn't leave a heavy build line like masking tape. Don't forget to cover all remaining
white areas against overspray. I then sprayed the FS12197 International Orange. A word of
caution: when removing the masking, always pull the masking away from the paint line when
possible- there's less chance of the paint peeling.
Next, complete the bare metal areas. I used Bare Metal foil on all these areas
as I wanted it to look like a "spit-shined" show bird (if you've ever seen AFFTC
aircraft, most of them are like this). The foil is really easy to use but you can do it
any way you prefer. Paint the engines black chrome and the inside of the burner cans jet
exhaust. Paint the outside of the burner cans Metalizer titanium along with the tail hook.
Polish the Metalizer and seal with clear. See figure 5. Paint the back side of the clear
navigation light the appropriate color and attach to the model with Super Scale Kristal
Klear. This method gives them the clear lens look. Apply your markings now.
I used a combination of the Cutting Edge, Detail & Scale, kit and Super
Scale decals. The Cutting Edge set is nice but it does not include any data. Use the kit
decals for the photo flash doors and any warning data stenciling. I also used the kit
ejection seat warning triangles- they looked better to me. Use Super Scale 1/32-in. black
stripes for the outline on the walkways, Detail & Scale formation lights.
Now it's time for final assembly, adding the landing gear and doors, canopies,
etc. Follow the kit instructions. Remember what I said about the main gear! Attach clear
parts with Kristal Klear and SuperBonder on the other parts. Put a drop of SuperBonder on
a piece of plastic card stock and apply with a toothpick. Putting the SuperBonder on the
card stock allows the aromatics of the cyanoacrylate ester to evaporate, thus virtually
eliminating the crazing and/or fogging of the paint. You can use this same method on clear
parts but use caution. Let it sit for a while before applying to your clear parts.
Remember that you can't wipe it of with water like you can Kristal Klear.
I used the F-15 style centerline tank, wing tanks and mounted the ECM pod on
the left inner Navy style pylon. It appears from my research material that the Navy pylon
was used on the RF. I mounted the Sidewinder rails on the right pylon with a pair of
Sidewinders from a Hasegawa F-16 kit. Some RFs later in their life were wired to fire
Sidewinders. I don't know if this particular aircraft was wired but hell, it looks neat.
I attached a combination of "REMOVE BEFORE FLIGHT" flags from the
Tamiya F-15E kit and Experts Choice sheet 32-1 to the appropriate locations on the
aircraft and in the cockpit. As the flags are printed on white paper, touch-up the edges
with red magic marker. I made the attaching cables out of fine armature wire. It's easier
to use than string and closer to scale. If you put the cable through the flags in a lose
loop, they'll swing in the breeze just like the real ones. Use Kristal Klear to attach
them to the model. Strip a piece of red insulated wire, the same diameter as the pitot
tube, cut into short lengths and use them as pitot tube covers. You can also use them for
the static vent cover on the right side. Don't forget to add the flags.
Here's a little trick for making missile seeker head covers. Cut strips from
the glossy page of a TV Guide. Roll the strips to fit the missile. Carefully apply white
glue to the seam on the strip. When dry, slide off the missile. Fill one end with Kristal
Klear. When dry, find a piece of sprue, stick it in the end, prime with gray and topcoat
with chrome yellow. When dry, add your flags and slide them onto your missiles. Simple,
huh!?
Well, there it is - a beautiful replica of an RF-4C in AFFTC markings, Edwards
AFB, CA.
This article was previously printed in "Smoke Trails", Volume 10,
Number 2. "Smoke Trails" is the Quarterly Journal of the F-4 Phantom II Society
of which I have been a member since 1988.
Henry
|